智能指针
基础概念
为什么要有智能指针
首先先看一段程序,看看这段程序可能会出现什么问题。1
2
3
4
5
6
7
8
9
10
11
12
13
14
15
16
17
18
19
20#include <iostream>
using namespace std;
void Func()
{
int* ptr = new int[10];
//...假设这其中有很多代码
throw "error!";
// delete[] ptr;
}
int main()
{
try
{
Func();
}
catch(const char* str)
{
cout << str;
}
}
首先这个代码中我们由于可能因为代码过于复杂而忘记释放空间,导致内存泄露,其次如果我们在这段代码中抛出异常,导致函数终止也会导致无法释空间,内存泄露,这种问题也被称为异常安全问题。作为Cpp程序猿,我们最烦也是最应该提防的一个问题就是内存泄露。那么针对这种情况我们象让我们动态分配的内存空间可以在生命周期结束后自动释放该怎么办呢?
什么是智能指针
智能指针是一个用于管理和存储指针的类,它利用对象出了作用域自动调用析构函数的特性帮助我们释放空间。接下来模拟实现一个简单的智能指针类。1
2
3
4
5
6
7
8
9
10
11
12
13
14
15
16
17
18
19
20
21
22
23
24
25
26
27
28
29
30
31
32
33
34
35
36#include <iostream>
#include <string>
#include <memory>
template<class T>
class SmartPtr
{
public:
SmartPtr(T* ptr)
:_ptr(ptr)
{
std::cout << "construct smartptr" << std::endl;
}
~SmartPtr()
{
if(_ptr)
{
delete _ptr;
}
std::cout << "destory smartptr" << std::endl;
}
private:
T* _ptr;
};
void Func()
{
std::string* ptr = new std::string;
SmartPtr<std::string> smartPtr(ptr);
}
int main()
{
Func();
}
construct smartptr
destory smartptr
以上这个智能指针类就已经基本实现了帮助我们在指针声明周期结束后自动释放内存空间的功能,这种与之类似的功能实现在Cpp中称之为RAII(Resource Acquisition Is Initialization),资源获取即初始化,是Cpp中常用的用于管理资源的方法,由这套方法产生了智能指针,当然还有智能锁,几乎所有我们在使用完必须释放资源的类型都可以使用这套方法进行资源管理。这套资源管理的方法使得我们不需要显示的释放资源,并且使资源在其生命周期内长期有效,出了作用域后自动帮助我们释放资源防止出现内存泄露的问题。
我们之前实现的只能发指针类并没有实现完全,因为作为智能指针我们必须要求它能够像指针一样进行使用。1
2
3
4
5
6
7
8
9
10
11
12
13
14
15
16
17
18
19
20
21
22
23
24
25
26
27
28
29
30
31
32
33
34
35
36
37
38
39
40
41
42
43
44
45
46
47
48
49
50#include <iostream>
#include <string>
#include <memory>
template<class T>
class SmartPtr
{
public:
//资源管理
SmartPtr(T* ptr)
:_ptr(ptr)
{
std::cout << "construct smartptr" << std::endl;
}
~SmartPtr()
{
if(_ptr)
{
delete _ptr;
}
std::cout << "destory smartptr" << std::endl;
}
//使其可以像指针一样使用
T& operator*()
{
return *_ptr;
}
T* operator->()
{
return _ptr;
}
private:
T* _ptr;
};
void Func()
{
std::string* ptr = new std::string("Hello");
SmartPtr<std::string> smartPtr(ptr);
std::cout << *smartPtr << std::endl;
std::cout << smartPtr->size() << std::endl;
}
int main()
{
Func();
}
construct smartptr
Hello
5
destory smartptr
这样就可以称为一个较为完整的智能指针了,但是单单这样还不够,因为这个类中最重要的也是最难处理的两个默认函数还没有书写,即拷贝构造函数和赋值运算符重载函数,这两个函数的处理也苦恼了Cpp标准库中的多种智能指针,接下来我们就要着重讨论标准库中对这两个函数的处理。
库中的智能指针
早在C++98的版本中就已经出现了智能指针,它叫auto_ptr,但是由于十分不好用于是后面在C++11中出现了unique_ptr和shared_ptr。不同的智能指针除了拷贝构造和赋值运算符重载函数的实现外其他都是大同小异,我们这里着重讨论他们在拷贝构造函数和赋值运算符重载函数上的不同。
为什么不同的智能指针在这两个默认成员函数上实现区别会很大呢?我们稍微思索即可发现,指针的拷贝和赋值往往和资源何时释放而挂钩。如果一个智能指针A拷贝了另一个智能指针B,而当B出了声明周期此时要不要释放资源呢?如果释放资源那么我们再次使用指针A就会有未定义行为的发生。但如果不是放那么何时又该释放资源呢?这些问题的处理上使得智能指针有了差别。
auto_ptr
auto_ptr诞生在C++98的标准库中,但是这也是问题最多的智能指针,他对拷贝构造即赋值运算符重载的处理我们可以用一句话总结,即管理权限转移,我们以下作个简单的例子。注意:auto_ptr在C++11中已经被删除,因此我们可以依照文档自己实现一个进行试验。1
2
3
4
5
6
7
8
9
10
11
12
13
14
15
16
17
18
19
20
21
22
23
24
25
26
27
28
29
30
31
32
33
34
35
36
37
38
39
40
41
42
43
44
45
46
47
48
49
50
51
52
53
54
55
56
57
58
59
60
61
62
63
64
65
66
67
68
69
70
71
72
73
74#include <iostream>
#include <string>
#include <memory>
template<class T>
class auto_ptr
{
public:
//资源管理
auto_ptr(T* ptr)
:_ptr(ptr)
{
std::cout << "construct smartptr" << std::endl;
}
~auto_ptr()
{
if(_ptr)
{
delete _ptr;
}
std::cout << "destory smartptr" << std::endl;
}
//使其可以像指针一样使用
T& operator*()
{
return *_ptr;
}
T* operator->()
{
return _ptr;
}
//拷贝构造和赋值运算符重载
auto_ptr(auto_ptr& ptr)
{
_ptr = ptr._ptr;
ptr._ptr = nullptr;
std::cout << "copy construct" << std::endl;
}
auto_ptr& operator=(auto_ptr& ptr)
{
if(this != &ptr)
{
if(_ptr)
{
delete _ptr;
}
_ptr = ptr._ptr;
ptr._ptr = nullptr;
}
std::cout << "operator=()" << std::endl;
}
private:
T* _ptr;
};
void Func()
{
std::string* ptr = new std::string("Hello");
auto_ptr<std::string> autoptr(ptr);
auto_ptr<std::string> copy(autoptr);
std::cout << *copy << std::endl;
std::cout << copy->size() << std::endl;
std::cout << *autoptr << std::endl;
std::cout << autoptr->size() << std::endl;
}
int main()
{
Func();
}
construct smartptr
copy construct
Hello
5
崩溃...
在这个模拟实验中可以看出auto_ptr管理权限转移的意义,它会在赋值或者拷贝后将原本的智能指针中所管理指针置空,如果我们再去访问原来的智能指针,结果就是未定义行为,程序崩溃,这指针真的太恶劣了。因此强烈不建议使用auto_ptr,不过好在库中已经删除了他,想用也没的用了,皆大欢喜。
unique_ptr
unique_ptr是C++11中智能指针的改进版本,它解决了auto_ptr可能会导致程序崩溃的问题,但是他解决的方法略为粗暴,即禁用拷贝构造和赋值。不让拷贝不就不会出现问题了,简单粗暴。1
2
3
4
5
6
7
8
9
10
11
12
13#include <iostream>
#include <memory>
#include <string>
int main()
{
std::string* ptr = new std::string("Hello");
std::unique_ptr<std::string> uniqueptr(ptr);
std::cout << *uniqueptr << std::endl;
std::cout << uniqueptr->size() << std::endl;
//拷贝构造和赋值被禁用,防拷贝
std::unique_ptr<std::string> copy(uniqueptr);//编译不通过
std::unique_ptr<std::string> copy2 = uniqueptr;//编译不通过
}
防拷贝很好的解决了auto_ptr的残留问题,我们也模拟实现一个unique_ptr。1
2
3
4
5
6
7
8
9
10
11
12
13
14
15
16
17
18
19
20
21
22
23
24
25
26
27
28
29
30
31
32
33
34
35
36
37
38
39
40
41
42
43
44
45
46
47
48
49
50
51
52
53
54
55
56
57#include <iostream>
#include <memory>
#include <string>
template<class T>
class Unique_Ptr
{
public:
Unique_Ptr(T* ptr)
:_ptr(ptr)
{
std::cout << "construct Unique_ptr" << std::endl;
}
~Unique_Ptr()
{
if(_ptr)
{
delete _ptr;
}
std::cout << "destroy Unique_ptr" << std::endl;
}
//使其可以像指针一样使用
T* operator->()
{
return _ptr;
}
T& operator*()
{
if(_ptr)
{
return *_ptr;
}
}
private:
//禁用拷贝构造和赋值运算符重载
Unique_Ptr(Unique_Ptr& ptr);
Unique_Ptr& operator=(Unique_Ptr& ptr);
T* _ptr;
};
void Func()
{
std::string* ptr = new std::string("Hello");
Unique_Ptr<std::string> uniqueptr(ptr);
std::cout << *uniqueptr << std::endl;
std::cout << uniqueptr->size() << std::endl;
//Unique_Ptr<std::string> copy(uniqueptr);//编译不通过
//Unique_Ptr<std::string> copy2 = uniqueptr;//编译不通过
}
int main()
{
Func();
}
construct Unique_ptr
Hello
5
destroy Unique_ptr
这个版本的智能指针十分好用,因为简单方便因此很少出问题,而且我们本来就不建议让智能指针出现拷贝,因为可能会引发一系列问题,所以这个版本的智能指针也是最为推荐使用的版本,如果要求必须可以进行拷贝那么还得考虑接下来的版本。
shared_ptr
shared_ptr是标准库中的支持拷贝和赋值的智能指针。1
2
3
4
5
6
7
8
9
10
11
12
13
14
15
16
17
18
19
20
21
22
23
24#include <iostream>
#include <memory>
#include <string>
int main()
{
std::string* ptr = new std::string("Hello");
std::string* ptr2 = new std::string("World");
std::shared_ptr<std::string> sharedptr(ptr);
//拷贝构造
std::shared_ptr<std::string> copy(sharedptr);
std::shared_ptr<std::string> copy2(ptr2);
std::cout << *copy2 << std::endl;
//赋值
copy2 = copy;
std::cout << *sharedptr << std::endl;
std::cout << copy->size() << std::endl;
std::cout << *copy2 << std::endl;
}
World
Hello
5
Hello
以上例子可以看出三个通过通过不同方式得来的智能指针都可以正常使用,虽然他们都指向相同的资源但是也可以很好的进行资源管理。shared_ptr之所以可以支持拷贝和赋值,是因为它对智能指针拷贝的处理是通过一个引用计数,引用计数用来保存当前资源被几个智能指针共享。
当新增一个智能指针指向某个资源时则引用计数+1,一个智能指针不再指向某个资源则引用计数-1,当引用计数为0时则说明已经没有智能指针指向这个资源则释放资源,否则不释放资源。
但是由于可能会有好几个智能指针共同维护同一份引用计数的情况,于是如果在多线程中引用计数可能会同时被多个线程进行操作,称为临界资源,于是就要考虑线程安全问题,为了解决这些问题就需要在适当的地方加锁,或者让其成为原子操作。
同样的这里模拟实现一份shared_ptr了解原理。1
2
3
4
5
6
7
8
9
10
11
12
13
14
15
16
17
18
19
20
21
22
23
24
25
26
27
28
29
30
31
32
33
34
35
36
37
38
39
40
41
42
43
44
45
46
47
48
49
50
51
52
53
54
55
56
57
58
59
60
61
62
63
64
65
66
67
68
69
70
71
72
73
74
75
76
77
78
79
80
81
82
83
84
85
86
87
88
89
90
91
92
93
94
95
96
97
98
99
100
101
102
103
104
105
106
107
108
109
110
111
112
113
114
115
116
117
118
119
120
121
122
123
124
125
126
127
128
129
130
131
132
133
134
135
136
137
138
139
140
141
142
143
144
145
146
147
148
149
150
151
152
153
154
155
156
157
158
159
160
161
162
163
164
165
166
167
168
169
170
171
172
173
174
175
176
177
178
179
180
181
182
183
184
185
186
187
188
189
190
191
192#include <iostream>
#include <memory>
#include <string>
#include <thread>
#include <mutex>
#include <vector>
template<class T>
class Shared_ptr
{
public:
//构造函数,应该初始化引用计数为1,并且初始化互斥锁
Shared_ptr(T* ptr)
:_ptr(ptr)
,_refCount(new int(1))
,_mtx(new std::mutex)
{
std::cout << "construct" << std::endl;
}
//拷贝构造
Shared_ptr(const Shared_ptr<T>& temp)
:_ptr(temp._ptr)
,_refCount(temp._refCount)
,_mtx(temp._mtx)
{
std::cout << "copy construct" << std::endl;
AddRefCount();
}
//赋值运算符重载
Shared_ptr& operator=(const Shared_ptr<T>& temp)
{
std::cout << "operator=" << std::endl;
if(&temp != this)
{
Release();
_ptr = temp._ptr;
_refCount = temp._refCount;
_mtx = temp._mtx;
AddRefCount();
}
return *this;
}
//析构函数
~Shared_ptr()
{
std::cout << "destroy" << std::endl;
Release();
}
//返回当前引用计数
int RefCount()
{
return *_refCount;
}
//像指针一样使用
T& operator*()
{
return *_ptr;
}
T* operator->()
{
return _ptr;
}
private:
//指针不再指向当前资源
void Release()
{
//操作临界资源,加锁
bool isRelease = false;
_mtx->lock();
//已经没有指针在控制当前资源
if(--(*_refCount) <= 0)
{
//释放资源以及引用计数
std::cout << "free resouce" << std::endl;
delete _ptr;
delete _refCount;
isRelease = true;
}
_mtx->unlock();
//锁不能在加锁中释放,因此要在锁中判断是否需要释放
//最后在锁外释放锁的资源
if(isRelease == true)
{
delete _mtx;
}
}
//有新的智能指针指向当前资源,增加引用计数
void AddRefCount()
{
//同样操作临界资源加锁
_mtx->lock();
++(*_refCount);
_mtx->unlock();
}
private:
T* _ptr;
int* _refCount;
std::mutex* _mtx;//互斥锁
};
void Test1()
{
std::cout << "Test1:" << std::endl;
std::string* str = new std::string("Hello");
std::string* str2 = new std::string("World");
Shared_ptr<std::string> sharedPtr(str);
Shared_ptr<std::string> sharedPtr2(sharedPtr);
sharedPtr2 = Shared_ptr<std::string>(str2);
std::cout << *sharedPtr << std::endl;
std::cout << *sharedPtr2 << std::endl;
}
void thr_start()
{
std::string* str = new std::string("Hello");
std::vector<Shared_ptr<std::string>> sharedPtr(10, str);
std::cout << sharedPtr[0].RefCount() << std::endl;
}
void Test2()
{
std::cout << "Test2:" << std::endl;
std::thread thr1(thr_start);
std::thread thr2(thr_start);
thr1.join();
thr2.join();
}
int main()
{
Test1();
Test2();
}
Test1:
construct
copy construct
construct
operator=
destroy
Hello
World
destroy
free resouce
destroy
free resouce
Test2:
construct
copy construct
copy construct
copy construct
copy construct
copy construct
copy construct
copy construct
copy construct
copy construct
copy construct
destroy
construct
copy construct
copy construct
copy construct
copy construct
copy construct
copy construct
copy construct
copy construct
copy construct
copy construct
destroy
10
destroy
destroy
destroy
destroy
destroy
destroy
destroy
destroy
destroy
destroy
free resouce
10
destroy
destroy
destroy
destroy
destroy
destroy
destroy
destroy
destroy
destroy
free resouce
shared_ptr在何种情况下乃至多线程的情况下都可以很好的管理和释放资源。
shared_ptr的线程安全问题
shared_ptr的线程安全要从两方面说起。
1、shared_ptr自身的线程安全。这里的线程安全指的是指针内部的引用计数这个临界资源的访问的安全问题,为了让指针知道何时该释放资源我们不得不在其中开辟一块供多个shared_ptr访问的引用计数,但如果在多线程中,就会发生线程安全问题。我们可以试着把上面模拟实现的代码中的增加和减少引用计数部分的锁删除掉,然后利用多线程多创建几个shared_ptr指向同一块资源,就会发现如果引用计数的改变不是原子操作,就会发生多个线程同时更改引用计数但由于资源不同步导致部分更改丢失从而使得智能指针管理的资源要么没有释放,要么提前释放,不过这点我们已经通过给临界资源的访问加锁从而得以解决,因此我们可以说 shared_ptr自身是线程安全的。
2、shared_ptr管理的资源的线程安全问题。不得不说如果智能指针所管理的资源本身就是临界资源的话,那么所有的智能指针在对这块资源的访问上都是线程不安全的,就像我们使用普通的指针访问临界资源一样,并不会因为我们使用了智能指针而使得原本临界资源的访问就受到了保护。这里的解决方法只能是从外部或者所管理的资源上添加访问保护才能解决,这与智能指针本身无关。但也不得不提 shared_ptr所管理的资源是有线程安全问题存在的。
shared_ptr的循环引用问题
shared_ptr的循环引用问题是一类非常经典的问题,它通常会出现在shared_ptr的使用中,导致资源无法正确被释放,看以下这个例子。1
2
3
4
5
6
7
8
9
10
11
12
13
14
15
16
17
18
19
20
21
22
23
24
25
26
27
28
29
30
31
32
33
34#include <iostream>
#include <memory>
//链表节点
struct ListNode
{
//ListNode* _next;
//ListNode* _prev;
//统一交给智能指针管理,也方便后面链表节点之间互相连接
std::shared_ptr<ListNode> _next;
std::shared_ptr<ListNode> _prev;
int _data;
~ListNode()
{
std::cout << "destroy" << std::endl;
}
};
int main()
{
//ListNode* node1 = new ListNode;
//ListNode* node2 = new ListNode;
//为了防止抛异常无法释放空间,将其交给智能指针管理
std::shared_ptr<ListNode> node1(new ListNode);
std::shared_ptr<ListNode> node2(new ListNode);
node1->_next = node2;
node2->_prev = node1;
//异常抛出操作
//...
//delete node1;
//delete node2;
std::cout << "program will over" << std::endl;
}
program will over
程序运行结束我们发现资源并没有被释放,为什么呢。1
2
3
4
5
6
7
8
9
10
11
12
13
14
15
16
17
18
19
20
21
22
23
24
25
26
27
28
29
30
31
32
33
34
35#include <iostream>
#include <memory>
//链表节点
struct ListNode
{
//ListNode* _next;
//ListNode* _prev;
//统一交给智能指针管理,也方便后面链表节点之间互相连接
std::shared_ptr<ListNode> _next;
std::shared_ptr<ListNode> _prev;
int _data;
~ListNode()
{
std::cout << "destroy" << std::endl;
}
};
int main()
{
//ListNode* node1 = new ListNode;
//ListNode* node2 = new ListNode;
//为了防止抛异常无法释放空间,将其交给智能指针管理
std::shared_ptr<ListNode> node1(new ListNode);
std::shared_ptr<ListNode> node2(new ListNode);
//node1->_next = node2;
//node2->_prev = node1;
//异常抛出操作
//...
//delete node1;
//delete node2;
std::cout << "program will over" << std::endl;
}
program will over
destroy
destroy
以上我们屏蔽掉了两行互相指向,也就是链表节点连接起来的代码,发现又可以正常释放资源了,为什么呢?以上这种现象就是循环引用,接下来图解以上过程说明为什么资源无法释放以及如何造成了循环引用。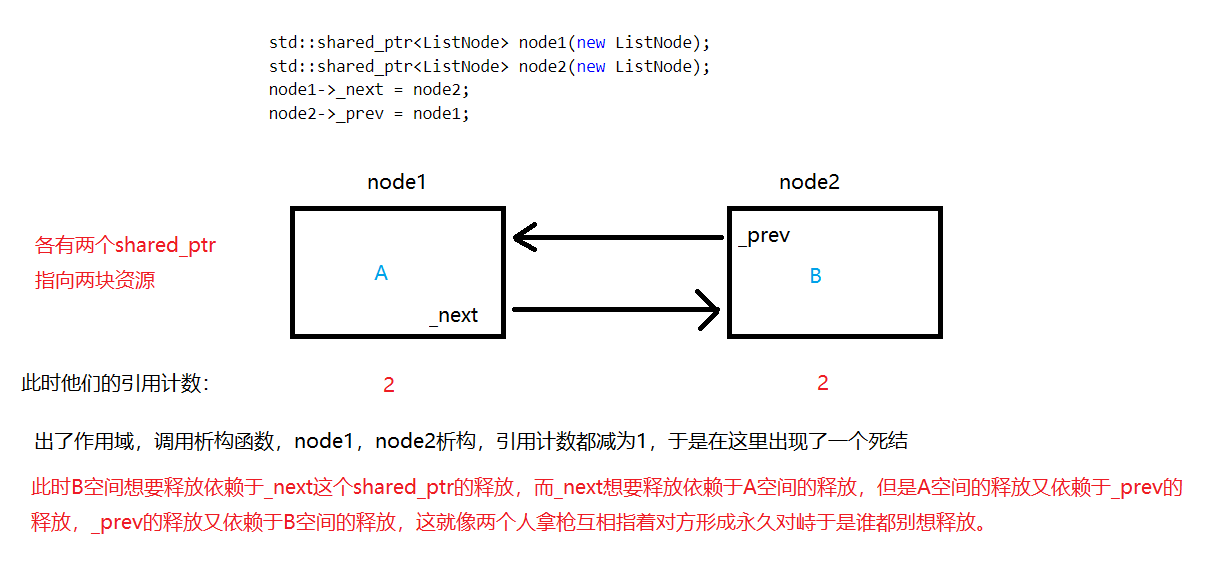
循环引用的典型场景就是一个shared_ptr指向一块内存空间A,空间A中还有一个shared_ptr指向另一块空间B,而空间B也由一个shared_ptr管理并且其中又有一个shared_ptr指向空间A,这样在释放时就会发生循环引用的问题,导致空间无法释放。那么如何避免循环引用呢?
造成循环引用的根结问题就是一个两个使用shared_ptr互相指向的空间使得对方空间的引用计数多加了一次,才造成了循环引用,只要我们让由shared_ptr管理的空间中的shared_ptr指向另一块由shared_ptr管理的空间时另一块空间的引用计数不增加就好了,简单来说就是避免一次引用计数的增加,就可以避免卡死。但是shared_ptr指向一块空间时此空间的引用计数必然会+1,这该怎么办呢?
在标准库中未我们提供了另一个智能指针weak_ptr,这个指针是专门提供给我们解决循环引用问题的,我们将代码修改一下先看效果。1
2
3
4
5
6
7
8
9
10
11
12
13
14
15
16
17
18
19
20
21
22
23
24
25
26
27
28
29
30
31
32
33
34
35
36
37
38#include <iostream>
#include <memory>
//链表节点
struct ListNode
{
//ListNode* _next;
//ListNode* _prev;
//统一交给智能指针管理,也方便后面链表节点之间互相连接
//std::shared_ptr<ListNode> _next;
//std::shared_ptr<ListNode> _prev;
std::weak_ptr<ListNode> _next;
std::weak_ptr<ListNode> _prev;
int _data;
~ListNode()
{
std::cout << "destroy" << std::endl;
}
};
int main()
{
//ListNode* node1 = new ListNode;
//ListNode* node2 = new ListNode;
//为了防止抛异常无法释放空间,将其交给智能指针管理
std::shared_ptr<ListNode> node1(new ListNode);
std::shared_ptr<ListNode> node2(new ListNode);
node1->_next = node2;
node2->_prev = node1;
//异常抛出操作
//...
//delete node1;
//delete node2;
std::cout << "program will over" << std::endl;
}
program will over
destroy
destroy
资源完美的释放了。那么是如何解决的呢?
首先可以将shared_ptr赋值给weak_ptr,因为weak_ptr就是专门为解决shared_ptr的问题产生的,并且weak_ptr指向某一shared_ptr管理的资源时它并不会增加该资源的引用计数,这完全符合我们解决循环引用的要求,避免了多增加的一次引用计数,于是问题解决了。
智能指针自定制deleter
之前我们的智能指针都是在单一的管理一块new出来的对象,那么如下产生的空间智能指针是否能进行管理呢?1
2
3
4
5
6
7
8#include <iostream>
#include <memory>
#include <string>
int main()
{
std::shared_ptr<std::string> sp1(new std::string[10]);
std::shared_ptr<std::string> sp2((std::string*)malloc(sizeof(std::string)));
}
智能指针无关版本默认释放资源都会去delete资源,然而我们new[]和malloc的资源必须通过delete[]和free才能完全释放或者不造成程序崩溃(malloc没有对对象初始化,如果对象内含有指针,使用delete释放资源调用析构函数可能会造成程序崩溃),因此我们想要正确释放资源就需要正确的deleter,也就是释放资源的方法,这样的方法被称为*删除器,当然智能指针也为我们留下了这样的接口,
我们可以通过传递一个仿函数去更改默认的delete方法。1
2
3
4
5
6
7
8
9
10
11
12
13
14
15
16
17
18
19
20
21
22
23
24
25
26
27
28
29#include <iostream>
#include <memory>
#include <string>
//自定义删除器
template<class T>
class FreeDeleter
{
public:
void operator()(T* ptr)
{
free(ptr);
}
};
template<class T>
class ArrayDeleter
{
public:
void operator()(T* ptr)
{
delete[] ptr;
}
};
int main()
{
//ArrayDeleter<std::string> ad;
std::shared_ptr<std::string> sp1(new std::string[10], ArrayDeleter<std::string>());
//FreeDeleter<std::string> fd;
std::shared_ptr<std::string> sp2((std::string*)malloc(sizeof(std::string)), FreeDeleter<std::string>());
}
这样就可以完成删除器的自定义。那么删除器是如何作用于智能指针内的资源的呢?在在智能指针准备释放资源时,他会调用仿函数删除器来释放资源,因此删除器也是一个回调函数,通过对删除器的自定义即可完成自定义释放资源。
RAII的扩展
RAII技术不光能使用在指针的资源管理上,一切需要我们手动释放的资源都可以使用RAII管理,比如锁。在库中有一套量身设计的用RAII来管理锁的类,叫做锁守卫,它可以帮助我们在锁超出作用域的时候自动解锁,防止我们中间抛出异常却没有解锁导致临界资源再也无法访问。
模拟实现一个锁守卫。1
2
3
4
5
6
7
8
9
10
11
12
13
14
15
16
17
18
19
20
21
22
23
24
25
26
27
28
29
30
31
32
33
34
35
36
37
38
39
40
41
42
43
44
45
46
47
48#include <iostream>
#include <mutex>
#include <thread>
template<class T>
class LockGuard
{
public:
LockGuard(T& lock)
:_lock(lock)
{
//std::cout << "lock" << std::endl;
_lock.lock();
}
~LockGuard()
{
//std::cout << "unlock" << std::endl;
_lock.unlock();
}
private:
//禁用拷贝构造和赋值运算符重载
LockGuard(const LockGuard& lck);
LockGuard<T>& operator=(const LockGuard& lck);
//这里的锁必须是引用形式的,因为要所在同一个锁上,不能拷贝
T& _lock;
};
std::mutex mtx;
int num = 0;
void thr_start()
{
//互斥锁力度越大越好,消耗会小很多
LockGuard<std::mutex> lck(mtx); //使用守卫锁
for(int i = 0; i < 1000000; i++)
{
++num;
}
}
int main()
{
//开启两个线程分别加num一百万次
std::thread thr1(thr_start);
std::thread thr2(thr_start);
thr1.join();
thr2.join();
std::cout << "num:" << num << std::endl;
}
num:2000000
库中的锁守卫。1
2
3
4
5
6
7
8
9
10
11
12
13#include <iostream>
#include <mutex>
#include <thread>
int main()
{
//std::mutex mtx;
//mtx.lock();
////...抛异常
//mtx.unlock();
//交给守卫锁
std::mutex mtx;
std::lock_guard<std::mutex> guard(mtx);
}
库中还有另一个锁守卫unique_lock,用法和lock_guard一致,那么两者有什么区别呢?
lock_guard只实现了RAII,因此加锁和解锁都由lock_guard控制,而unique_lock实现了更多的功能,它可以允许我们自己手动加锁,也可以手动解锁,也可以不阻塞地加锁。